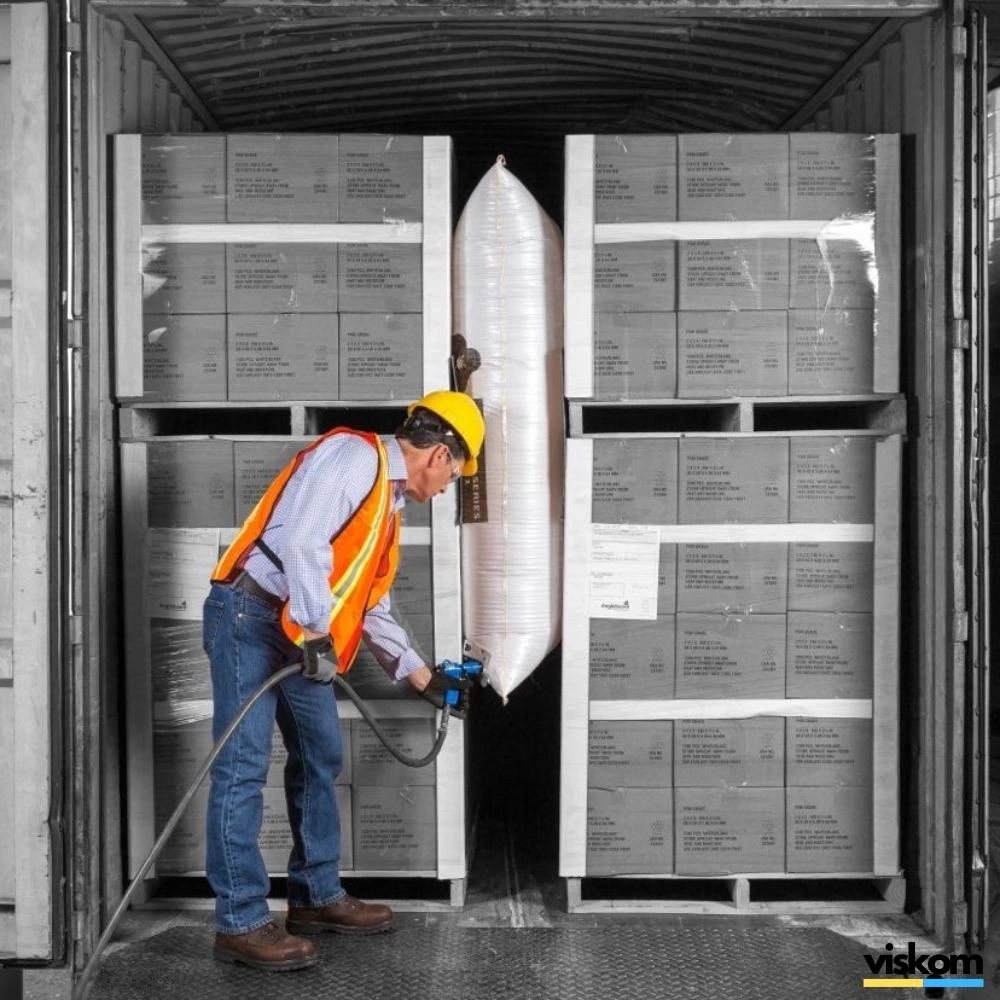
How to Install Dunnage Bags: Step-by-Step Guide
How to Install Dunnage Bags: A Step-by-Step Placement Guide
A dunnage bag only works if it is installed correctly. Most dunnage bag failures are installation failures: the wrong size for the gap, the bag placed too low, inflated by eye instead of by gauge, or pressed against a surface that cannot take the load. The product itself is rarely the problem.
This guide walks through installation step by step, from measuring the void to removing the bag at destination, with a placement guide for the most common gaps in containers, trucks and rail wagons and a checklist your loading team can use on every shipment.
Before you start: tools and preparation
Have these ready before the first pallet goes in:
An inflation tool with a pressure gauge. Bags should be inflated to a measured pressure, not "until firm". A gauge is the only reliable way to do that.
A compressed air supply suited to the inflator, with enough capacity to fill bags quickly at the loading bay.
A tape measure for the void widths.
The right bags for the load, matched by size and grade. If you are unsure, our guide to dunnage bag sizes and level ratings explains how to choose.
Spare bags. A bag damaged during loading should be replaced, never patched.
Plan the load so that voids are left where bags can work: ideally between rows of cargo with flat, sound faces on both sides.
Step 1: Load the cargo tightly first
Dunnage bags fill the gaps that remain after good loading; they do not replace it. Load pallets and cartons as tightly as possible against the container walls and against each other. Spread the weight evenly across the floor. The fewer and smaller the voids, the less work each bag has to do.
Step 2: Measure each void
Measure each gap at its widest point, not the narrowest. A bag chosen for the narrowest point will be loose wherever the gap opens up. Also note the height of the cargo faces on either side.
If a void is wider than a single bag can safely fill, reduce it first: move cargo, add a pallet, or use a rigid filler to narrow the gap, and then brace the remainder with a bag.
Step 3: Choose the size and grade
Pick a bag that, once inflated, will cover as much of the cargo face as possible. Bags too small for the void cannot spread the force across the load.
Choose the grade by the weight of the cargo and the mode of transport. Heavier loads and rougher journeys need stronger bags; rail freight in North America requires bags certified by the Association of American Railroads, explained in our AAR dunnage bag guide. For humid or long sea routes, choose a woven polypropylene outer rather than kraft paper; our paper vs polywoven guide explains why.
Step 4: Position the bag
Slide the deflated bag into the gap with the valve facing you so it can be reached for inflation and, later, deflation.
Height: position the bag so it braces the middle of the cargo faces, not the bottom. A bag sitting low can let the top of a stack tip over it.
Contact: both faces must be flat and structurally sound. A bag pressed against a weak carton will crush that carton rather than hold the stack.
Edges: keep the bag clear of protruding nails, strapping buckles, sharp pallet corners and the container's corrugated wall ridges. Protect sharp faces with a sheet of board if needed.
Floor: the bag should not rest on the floor bearing its own weight unsupported; it should be held in place by the cargo on either side.
Step 5: Inflate to the recommended pressure
Connect the inflator and fill the bag to the working pressure recommended by the manufacturer for that grade, read on the gauge.
Two warnings:
Do not over-inflate. Excess pressure can crush the cargo, and it leaves no margin for the pressure rise that happens when the container heats up in the sun.
Do not under-inflate. A soft bag will lose contact as the load settles, and cargo will start to move.
Every bag has a burst pressure, and the working pressure is set well below it. Never inflate towards the burst figure.
Step 6: Check the result
Once all bags are inflated:
The bag should be in firm contact with both faces along its length.
The cargo should not move when pushed by hand.
The valve should be sealed and accessible.
No bag should touch the container doors.
Record the number, size and position of the bags on the load plan. It helps the receiving team and gives you evidence if a claim arises.
Placement guide for common voids
Void location | Where to place the bag | Points to watch |
|---|---|---|
Between two rows of pallets across the container width | Centrally in the gap, braced at mid-height of the stacks | The most common and most effective position |
Side gap between cargo and container wall | Full length of the gap against the cargo face | Protect against the wall's corrugations |
Between stacked cartons in the middle of the load | Against full, flat carton faces | Do not brace against half-empty or crushed cartons |
Behind the last row near the doors | Between the last two rows, never against the doors | Fit a barrier or bulkhead if the last row must be secured |
Gaps between drums, coils or irregular items | Against the flattest available surface | Use protective board between bag and sharp edges |
Why never against the doors
A bag braced directly against the container doors transfers its force to the door locking bars. When the doors are opened at destination, the load can push them open suddenly and cargo can fall out. Always leave the bag between two rows of cargo, and if the final row needs securing, use a barrier designed for that purpose.
Trucks, trailers and rail wagons
The same steps apply on road and rail, with some differences:
Trucks and trailers see heavy braking and cornering forces. Check that bags brace the full height of tall stacks, and re-check after any long stop if the load is reopened.
Rail wagons see hard coupling and shunting impacts. These forces are the reason rail rules in North America require AAR-certified bags.
Air cargo sees pressure changes with altitude, so follow the manufacturer's guidance on inflation pressure for air freight.
At destination: deflating and removing the bag
Open the doors carefully and check for any movement before unloading. Then:
Open the valve to deflate the bag before pulling it out; never cut or pierce an inflated bag.
Remove the bag once the adjacent cargo is stable.
Inspect reusable bags for cuts, abrasion and valve damage. Retire any that are damaged.
Store reusable bags flat, dry and out of direct sunlight.
Send single-use bags for recycling, separating paper shells from film bladders where required.
Installation checklist for your loading team
Cargo loaded tightly, weight spread evenly
Each void measured at its widest point
Bag size covers the cargo face; grade matches load and route
Bag at mid-height, between sound, flat faces
Sharp edges protected
Inflated to the recommended pressure on a gauge
Valve sealed and accessible
No bag against the doors
Bag positions recorded on the load plan
For the wider picture of preparing a container for export, see our export packaging guide, and for how dunnage bags are built and rated, our air dunnage bags guide.
Common installation mistakes
Choosing a bag for the narrowest point of the void. It will be loose where the gap is wider.
Placing the bag at floor level. The top of the stack can tip over it.
Inflating by feel. Without a gauge, bags are routinely over- or under-inflated.
Bracing against damaged cartons. The bag pushes the carton in instead of holding the stack.
Putting a bag against the doors. It creates a safety hazard for whoever opens the container.
Reusing a damaged bag. A cut or worn bag can fail mid-journey.
Stuffex dunnage bags from Shish
Shish SmartPack manufactures Stuffex air dunnage bags in Surat with a multi-layer co-extruded polyethylene inner bladder and a woven polypropylene or kraft paper outer shell. They are available in light-duty, medium-duty, heavy-duty and AAR-certified rail grades, in standard sizes of 36" x 48", 36" x 72" and 48" x 96" plus custom sizes, with burst pressure from 0.2 to 0.6 bar depending on grade and a working temperature range of -20 °C to +70 °C.
Options include standard fast-fill valves compatible with common inflation tools, reusable valves for multi-trip use, and an anti-slip surface for better grip against container walls and cargo stacks. See the full specifications on the air dunnage bags page and our certifications.
Frequently asked questions
How do you install a dunnage bag?
Load the cargo tightly, measure the void at its widest point, choose a bag that covers the cargo face, position it at mid-height between two flat cargo faces, and inflate it to the manufacturer's recommended pressure using a gauge.
Where should dunnage bags be placed in a container?
Between rows of cargo, most commonly across the container width between pallet rows. Never place a bag directly against the container doors.
How much should I inflate a dunnage bag?
To the working pressure the manufacturer recommends for that bag grade, measured on a gauge. Over-inflation can crush cargo; under-inflation lets the load move.
Can one dunnage bag fill a very wide gap?
Only up to the limit for that bag size. If the void is wider, reduce it with extra cargo, a pallet or a rigid filler first, and brace the remaining gap with a bag.
How do I remove a dunnage bag at destination?
Open the valve to deflate the bag, then remove it once the surrounding cargo is stable. Never cut an inflated bag.
Can dunnage bags be reused?
Bags with reusable valves can be deflated and used again after inspection. Damaged bags should be retired.
Get help planning your load
Tell us your cargo, container type and route. Our team will recommend the bag sizes, grade and quantity for your load, and quote against a specification you can check.
Request a dunnage bag recommendation and quote
Or speak to the team through the contact page.
